Why this article
Hi Everyone, so this is my first blog on the Fastai book that I have started reading recently. It has been a fascinating read so far. I have just completed my second chapter, and book has already taught how to built a high quality deep learning image classification model. Though, if you are a beginner in this field, and don’t understand the math and programming architecture very well behind the state-of-the-art networks used in building a deep learning model (like, Resne18), this chapter basically teaches you how to build a DL model with very few lines of codes and also deploy it as a web application, and doesn’t go into intricacies of the architecture.
This last part of deploying the model has what fascinated me the most in this chapter. So, I figured that most of you might not be able to put many hours behind this book, due to your already busy schedules, it will be beneficial for you to read this blog and use this to build your first model along with deploying it on the web. Jeremy and Sylvain’s book has a dedicated website too on which you can simply go and read all the chapters and copy code to run in your own environment. Still, it leaves out a lot of work for you to figure out as you go. For example, I encountered a number of errors and countless confusions while implementing the learnings from this particular chapter. I would be glad to share my learning through this blog, so that anyone who is not reading the book, or who has read it and is stuck somewhere, can use this article to sort them issues out.
Gathering Data
I have used Microsoft Bing’s limited period free image download web API. The free API version enables me to download 150 images in one go. For this I just had to create an Azure account and register for Bing Image search application in it. I will be walking you through the steps I have taken, and will guide you against possible hiccups that you may encounter during your efforts. Data gathering was an interesting and fun part of the entire project. If you are building your own data and then deploying your model at the end too, then you are among the very few data science practitioners who can boast about doing so.
This part is crucial for a data scientist because until and unless you have clean training and validation data, you cant really build a model. A Data Science project pipeline starts with Gathering and Cleaning of data and ends up at Deploying the model.
Building a Computer Vision model

So, I have build a fun web application using the techniques that I have learned from this chapter. My web application identifies whether the incoming image (one image at a time) is of the actress Jessica Chastain or Bryce Dallas Howard. So, the idea is to identify an incoming image to one of these two classes.
Now, I could have gone with classifying between images of Cats and Dogs or between different food items or between different clothing accessories, instead, I chose this particular case of differentiating between doppelgangers because firstly this was fun (LoL), and secondly, these two actresses have confused me a lot in the past. I used to mix up the two of them and I am not alone in this! (guffaw). This has been acknowledged by various online publications as well (a popular platform’s link is below).
Okay, fun apart, this has been an interesting application to develop and even though my model was able to predict with 91% validation accuracy between the two actresses (with just 5 epochs and less than 150 samples of each actress!), new incoming images of Bryce Dallas Howard were often confused with Jessica Chastain, confirming my doubts that sometimes it is very difficult to identify between them who’s who.
Deploying the model
I have used Binder, which is a free and simplest method out there to publish your web app online. This allows you to host a POC type or a hobby type project of yours for bigger community to see it easily by clicking on a link. I will be sharing at the end, my very own web application’s link (drumrolls) as well as will teach you, how you can do the same. Please keep in mind that Binder is a free support available online, so it can suffer some glitches or lag time when you will try to access my or later your own applications online.
Process in details
This chapter basically allays the doubts like, you need vast amount of data, and need to write a large number of code-lines to do deep learning or to build highly accurate AI models.
This is made possible by using the power of Transfer Learning, Data Augmentation and of course the fastai libraries, which are build over Pytorch framework. This is the first time I am using anything other then Tensorfloww or Keras, and I must say fastai library is quite intuitive and easy to understand and pick. In any supervised deep learning project, you need some good quality data and its corresponding labels. So, lets start by creating our data repositories first.
1. Data Preparation
In this project, I am basically developing an actress detector model. So first of all I need to download some images of Jessica Chastain and Bryce Dallas Howard. I am going to use the Bing Image Search API for this. As far as I know, this is the best available option out there if you want to build small sized image datasets for your POCs or hobby projects. It is free for up to 1000 queries per month and allows you to download 150 images at a time. Bing Image Search API is available as a part of Azure Cognitive Services. You need to follow below steps in exact order to be able to do so :
-
Create your own free account on Azure by goin here - portal. System will ask for your credit card details, but don’t be alarmed as only 2 INR will get deducted and after your free trail expires, Microsoft Azure will not auto deduct any amount. Money will be ducted only if you want to extend the Azure services.
-
After creating Azure account, create a cognitive service, by following instruction given on the azure link.
-
Next, create a Bing Image Search Resource
-
Go to ‘Keys and Endpoint’ in this cognitive service. Copy one of the two keys shown there and paste it somewhere safe for a while for later use.
Now we will use this key to access Bing search engine and will download a set of 150 images for each of the class or, to say, the actress name. The code for assigning the key to environment variable is given below, where XXX is the key you have just copied -
key = os.environ.get('AZURE_SEARCH_KEY', 'XXX')
Lets look at a sample image that is downloaded for Jessica Chastain as a query result. First of all, getting a list of URLs:
results = search_images_bing(key, 'jessica chastain')
ims = results.attrgot('content_url')
len(ims)
Now downloading the sample data corresponding to the first image search result -
dest = '/your/google/drive/location/jessica1.jpg'
download_url(ims[0], dest)
Displaying the results -
im = Image.open(dest)
im.to_thumb(128,128)
The sample output that we get is:

This seems to be working nicely till now. Next, we need to download and save 150 images each for both the actresses. The code for doing so is -
actress_names = 'jessica chastain', 'bryce dallas howard'
path = 'your/google/drive/location/where/you/want/save/data'
for o in actress_names:
    dest = path + o
    os.mkdir(dest)
    results = search_images_bing(key, o)
    for img in results.attrgot('content_url'):
      print(img)
      download_url(img, dest+'/'+img[-img[::-1].find('/'):])
Our folder has image files, as we’d expect. However, usually, when we download images from the internet, few corrupt ones are bound to get downloaded. Since this dataset is very small, you can either go and remove them manually, or you can use the verify_images function of fastai, which I am not covering here for the brevity of the topic. Please explore on your own.
2. Data Loaders
DataLoaders is a class which takes the Data Loader objects passed to it, and convert them into train and validation set.
actress = DataBlock(
    blocks=(ImageBlock, CategoryBlock),
    get_items=get_image_files,
    splitter=RandomSplitter(valid_pct=0.2, seed=42),
    get_y=parent_label,
    item_tfms=Resize(128))
To turn our downloaded files into dataloaders object, fastai needs at least four different things -
- What kind of data we are working with. This tuple specify what type of data we want as dependent and independent variables respectively.
blocks=(ImageBlock, CategoryBlock) - How to get the list of items.
get_image_filestakes a path and returns a list of all of the images in that path. - How to label these items.
get_y=parent_labelgives the name of the folder in which images are kept as the class label. - How to create the validation set.
RandomSplitter(valid_pct=0.2, seed=42)gives you train and validation sets by splitting the available data into 80-20% respectively.
We feed images in our model in batches to train on them. As such, the size of each image should be same in a batch. This is taken care by item_transform functions, and here we are passing it the required size as 128 by 128 pixels.
Actual source of data is given to the dataloaders object as a location, as shown below -
dls = actress.dataloaders(path)
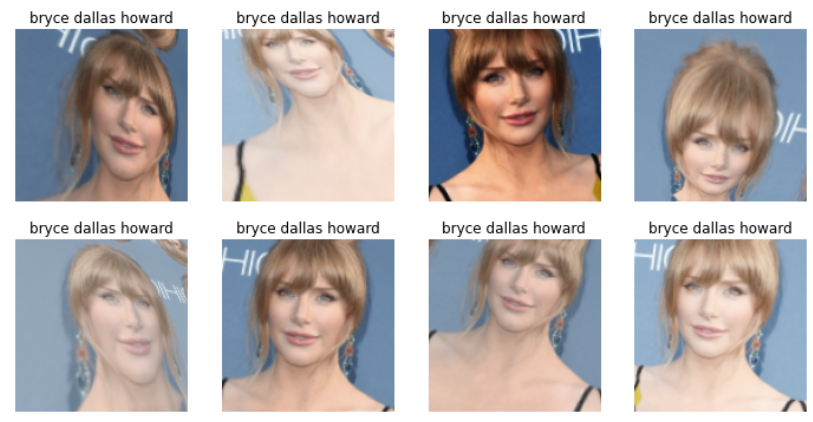
We can also look at some sample of images from validation or training dataloader objects as shown (code and output) -
dls.valid.show_batch(max_n=4, nrows=1)

Since our dataset is small, we need to augment the size by doing some operations on images which create a new image without changing the meaning or affecting their class labels. Examples of such operations are - flipping an image horizontally and vertically, brightness and contrast changes, shearing an image or warping it at an angle.
The code that I am using for this augmentation is -
actress = actress.new(item_tfms=Resize(128), batch_tfms=aug_transforms(mult=2))
dls = actress.dataloaders(path)
dls.train.show_batch(max_n=8, nrows=2, unique=True)
Note that here I am applying batch transformation by using batch_tfms parameter. aug_transforms works best for the set of augmentation requirements listed above. fastai enables the hyperparameter tuning a very easy task. As you can see that I am simply using the dataloader object and describing or adding new parameters to it.
The output that we get is -
3. Training the model
I will now create our model or learner, and would then fine-tune it -
learn = cnn_learner(dls, resnet18, metrics=error_rate)
learn.fine_tune(5)
Lets understand these code lines. First line instructs fastai to create a convolutional neural network (CNN) and specifies the architecture that fastai should use (resnet18). Resnet architecture will be the kind of model that fastai will create. Resnet is a standard architecture which is both fast and accurate for most of the image datasets and problems. The 18 in resnet18 refers to the depth or the number of layers in the network. The other standard options are 50,101 and 152. metrics=error_rate is meant for measuring the quality of the model while using the validation set. This metric value will be printed at the end of each epoch. And an epoch is just one complete round of the model training through the image dataset.
There is one more parameter called pretrained which is by default set to true. This would mean that resnet18 is already trained on ImageNet dataset. ImageNet refers to the large image dataset consisting of more than 1.2 million images divided into 1000 classes. Each year a classification competition is held which is called ILSVRC, in which individuals and teams take part to build classification and detection models. Historically the error rate has decreased in every competition year. So, this resnet18 is trained on this large dataset and had attained very high state-of-the-art performance on it. Thus the weights or parameters of this resnet model are pretrained or learned from the previous task only. Using a pretrained model into a new classification task is called Tansfer Learning. Using such pretrained models, reduces the training time as well as improve the model performance manifolds.
Second line learn.fine_tune(4) implies that a pretrained model is simply used, or it will be fine tuned on the new dataset. Entire Imagenet pretrained/existing weights are not disturbed during fine tuning exercise and only last few layers are trained on the new data. I will write a separate post later explaining the reasoning behind, the working, and the performance of transfer learning using fine tuning. This is a great topic and has been a topic of my final dissertation too. More on this in later posts.
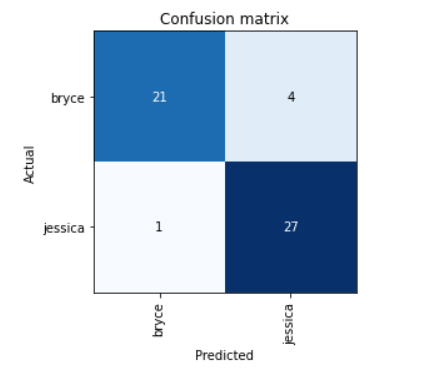
Lets look at the performance of our model - by plotting the confusion metrics:
interp = ClassificationInterpretation.from_learner(learn)
interp.plot_confusion_matrix()
Now, fastai comes with wonderful functionality of identifying the images which have high loss values as well as which are incorrectly classified by our model.
As we can see, there are a total of 5 incorrect classifications. Using below code line, I am able to display the images with highest loss values (decreasing loss from left to right), along with their predicted label, followed by actual label, loss value, and lastly the predicting accuracy. You can see even a machine is finding it difficult to tell Jessica and Bryce apart, and we are mere mortals. Note that, this exercise is being done on Validation data.

Sometimes, and since our dataset size is very small, Jeremy suggests that we can make good use of this information and can counter check if the validation set has incorrect actual labels or not.
The book further suggests that one should follow this intuitive approach to doing data cleaning. First - Build a quick, simple and small model, and then, use it to help identify incorrectly identified actual class labels. There is also a handy GUI data cleaner that comes with fastai bundle and it is called ImageClassifierCleaner, but more on it maybe later in some another post. It’s only Chapter 2, I am sure I will encounter it again in later chapters.
4. Turning trained Model into an Online Application
Finally we will train our model, build an app, and would then deploy online as a web-application (excited!)
Saving Model
A model consists of two parts - architecture and the trained weights. Easy way to save a model is to save both of them together, that way you don’t have to load them separately at the time of predicting results on new value or drawing an inference. To save both elements together in one go, fastai uses export method. Using method fastai saves a pickle file or a serialized file.
save_path = Path('/path/gdrive/to/your/location/')
learn.export(save_path/'actress.pkl')
Using Model as Inference
We can use load_learner method of fastai to reload a model back into memory and then use it draw inference on an incoming image. To do this, just pass the filename and path to predict method of fastai. It will return three items - predicted label class, index of predicted label, and probabilities of each class.
learn_inf.predict(save_path/'jessica-sample.jpg')
Output will be -
('jessica', tensor(1), tensor([0.0211, 0.9789]))
Building an App
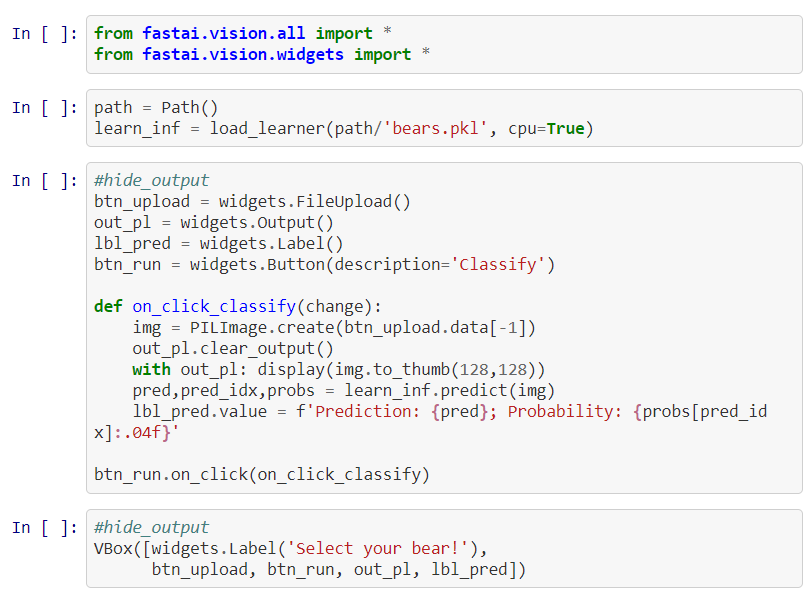
For this part, you don’t have to be proficient in web development. Know that, you can create a complete working app using only your jupyter notebook. Exciting, isn’t it? What makes this possible is Ipython widgets called Ipywidgets and a renderer called Voila. Voila allows users to avoid running jupyter notebook from their front-end. It converts the entire notebook into a deployable web-application. While, Ipywidgets helps in building buttons as a part of our graphical user interface.
btn_upload = widgets.FileUpload()
out_pl = widgets.Output()
lbl_pred = widgets.Label()
btn_run = widgets.Button(description='Classify')


def on_click_classify(change):
    img = PILImage.create(btn_upload.data[-1])
    out_pl.clear_output()
    with out_pl: display(img.to_thumb(128,128))
    pred,pred_idx,probs = learn_inf.predict(img)
    lbl_pred.value = f'Prediction: {pred}; Probability: {probs[pred_idx]:.04f}'

btn_run.on_click(on_click_classify)
First line of this code, uses widgets to create a button to upload images, and second displays the image on the screen. Label widget helps in displaying the assigned labels from model inference, and create another button which will classify the image or will run the inference on our image. Defined function acts as a click event handler on classify button. Putting entire thing into a single box to display all things together -
#hide_output
VBox([widgets.Label('Select the Actress!'),
      btn_upload, btn_run, out_pl, lbl_pred])
And the output is -
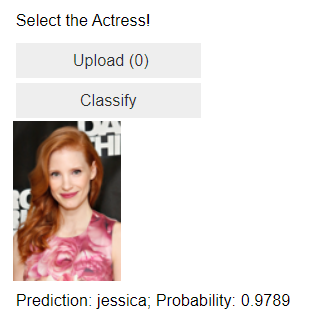
We can see that, model is able to predict image as Jessica Chastain and with very high confidence or probability.
Now, please go ahead and install Voila and enable the jupyter extension as shown -
!pip install voila
!jupyter serverextension enable voila —sys-prefix
Deploying your Model
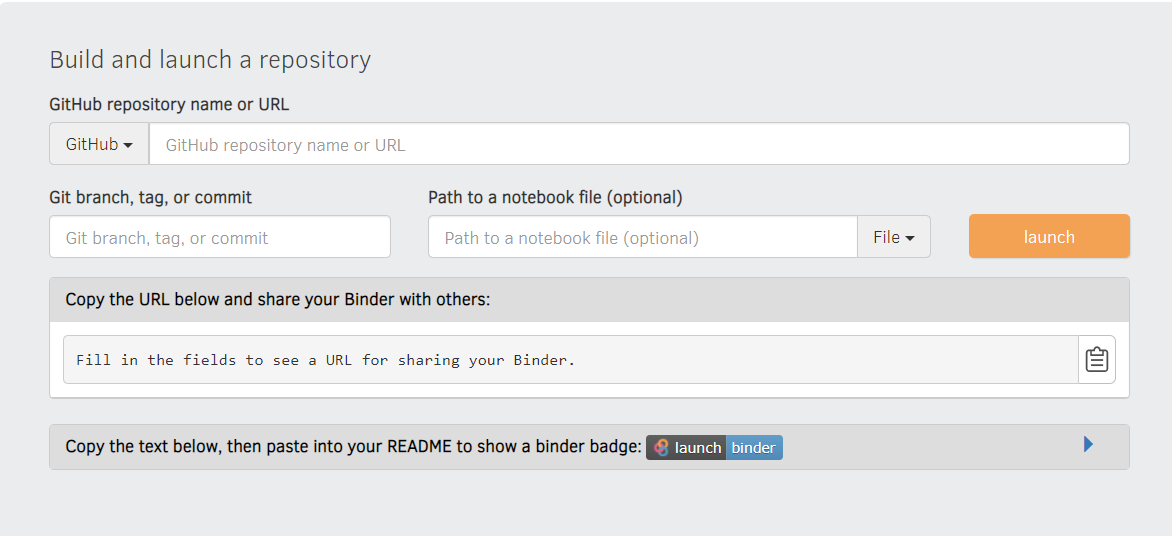
As mentioned at the start, I am going to use Binder app to deploy or publish my app that I have just created. It can be done, by following some easy steps-
- Create a Github Repository and place your saved model file (actress.pkl), your notebook (.ipynb file) with jupyter extension enabled in it, a Requirements.txt file with the contents as shown and an optional Readme markdown file to provide a brief to a visitor.
- Paste your Repository’s URL exactly as shown in the below Binder image (with trailing forward slash)
- Change the dropdown to URL
- In
Url to opentype/voila/render/name_of_your_notebook.ipynb - Copy the url getting displayed. You can use this to share your app with someone else.
- Click Launch button lastly.
Make sure the contents of Requirements.txt are exactly these -
voila
fastai>=2
pillow<7
packaging
ipywidgets==7.5.1
Also, make sure that your jupyter notebook or the .ipynb file, looks like this -
The binder options should be filled as shown in below image, else you might get pesky errors and will waste a lot of time in googling about them and resolving them.
This is how you should configure your Binder app -

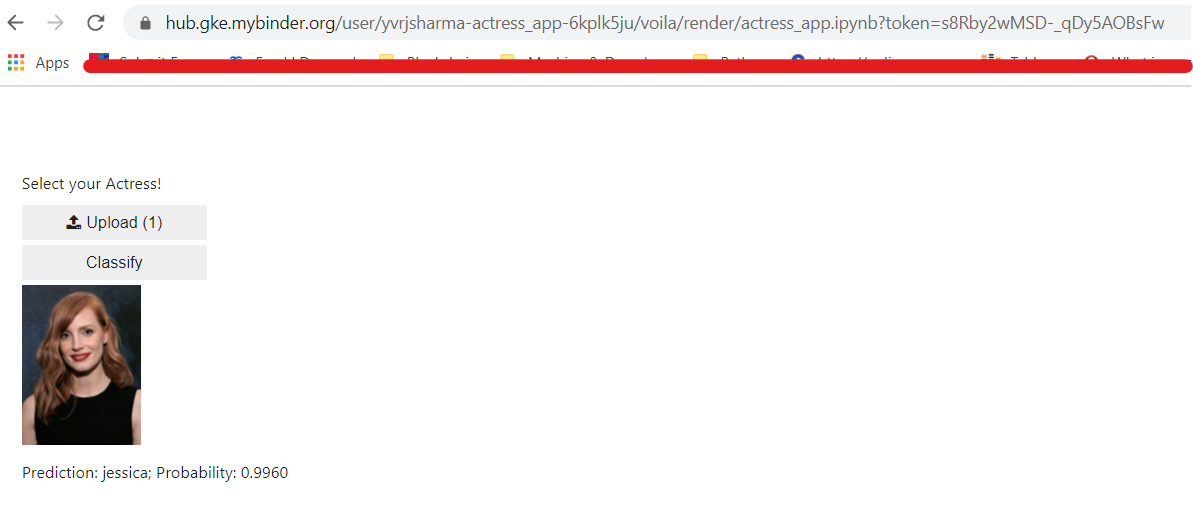
Please look at below snapshot of the app once it gets deployed -
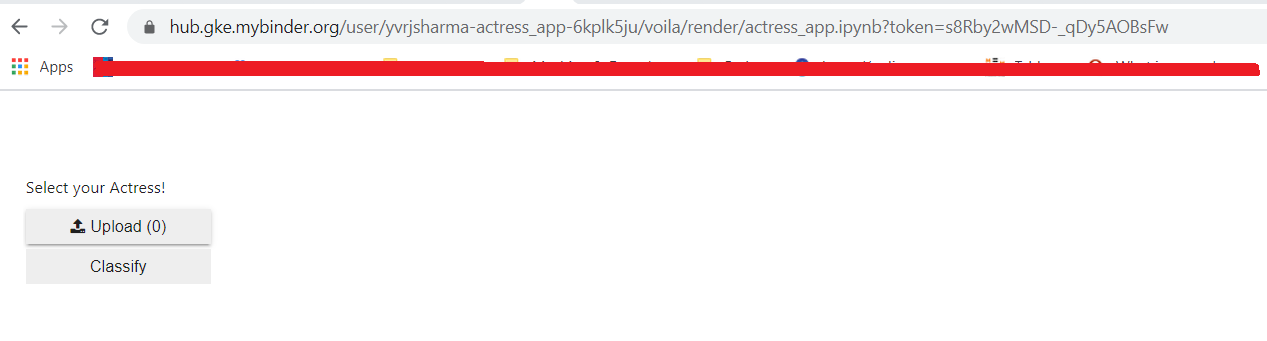
And below snapshot shows how the model is behaving to an incoming picture of Jesscica Chastain -
Please feel free to access my online app at this - link.
Also, please note that Binder is a free service (so far!), so this link might not stay active in distant future or they (myBinder) might change their terms and services.
So, this completes a very lengthy post about how to create a deep learning model, right from gathering your own image data, to the very end of the life-cycle of an ML project - its actual deployment in production! You can also use this trick to show off your hobby models or personal projects to prospective employer companies or recruiters or friends.
Keep Learning! Until next time, Cheerio!